This documents summarizes the content of a lecture I held at TU Dresden in support of the Software Engineering Lab. Its primary goal is to ramp up the students with the very basics of Java web application development. If you’re looking for the script used in years 2014 and 2015, it’s been relocated to here.
Introduction
The fundamental goals of the lecture are:
-
Learn how a web application works fundamentally
-
Learn how you’d implement a web application using Spring MVC
The lecture content is three-fold: we’re going to start by looking at how a web application works fundamentally. Having identified the most crucial aspects of that, we’re going to explore how to use Spring MVC to implement those aspects using Spring MVC. We’re then going to have a look at how to integrate business code with the code we wrote for the web handling.
Once that’s done we’re exploring what the Guestbook sample application[1] consists of. We’re then going to cover aspects of Spring Data JPA to implement persistence and Spring MVC for the web layer.
The source document for this script can be found in this GitHub repository. Feel free to create tickets for improvements or provide patches via pull requests.
Prerequisites
This script assumes you’ve worked through the scripts of the summer semester:
-
Fundamentals of Java Tooling — will ramp you up on the most fundamental tools you’re gonna be working with when developing Java applications: IDEs, build tools etc.
-
Frameworks & Libraries — will ramp you up on the topic of how to work with libraries and frameworks with Spring as application framework in particular.
-
Domain-Driven Design & Spring — will ramp you up on the fundamental concepts of Domain-Driven Design and how those concepts are reflected in Spring Framework applications.
-
Collaborative Software Development (optional) — will ramp you up on tools and methodologies used when writing software in a team.
1. Fundamentals of the web
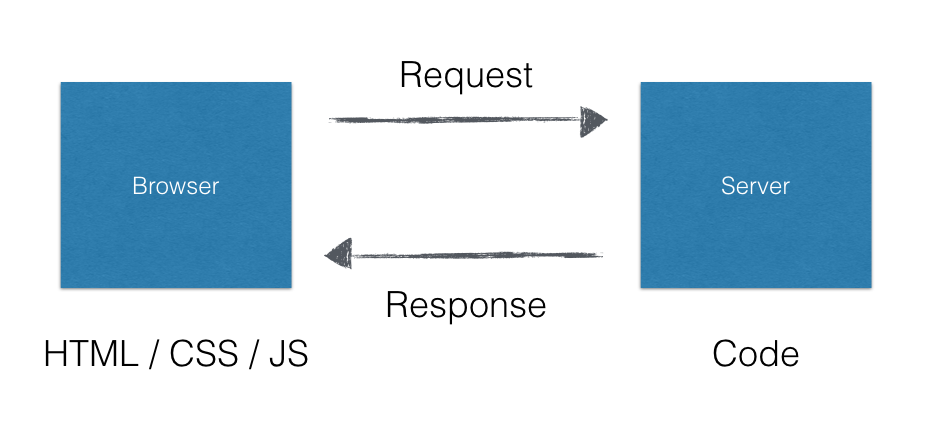
Objective: understanding the building blocks of the web to a degree that it allows you to understand how a browser interacts with a server.
-
Biggest distributed network ever built (REST → Roy Fielding’s dissertation)
-
Browser → Request (Header, Body)→ Server
-
Server → Response (typically HTML, JSON) → Clients interprets response
-
Resources, URI, uniform interface (HTTP methods)
2. Handling web requests with Spring MVC
-
MVC in the web: Model, View, Controller
-
Model: data to be presented, a certain view on the domain model of the server.
-
View: a template to describe the representation (usually using some mechanism for dynamic composition)
-
Controller: a piece of code that translates HTTP requests into the calls to the actual business logic
2.1. Mapping a request
First thing we have to take care of is that a web request actually triggers some of our code is actually invoked. To achieve that Spring MVC provides a variety of annotations to allow us to define for which requests a method should be called.
MyController.java in package example under src/main/java@Controller (1)
class MyController {
@GetMapping("/hello") (2)
void myMethod(@RequestParam Optional<String> name) {} (3)
}| 1 | As the name suggests , the @Controller annotation declares the class to be a controller.
This will cause Spring MVC to create an instance of that class and inspect it for request mapping annotations so that it can route incoming requests to them. |
| 2 | Maps the method to a particular request. I.e. if a request is matching the configuration, the method will be called. |
| 3 | Annotated parameters to access parts of the request, in this case a request parameter named name. |
Declaring a class like just seen will cause our method to be called for GET requests to /hello.
The method will receive the name request parameter wrapped into an Optional if the parameter was present in the request.
If no parameter named name was present, the method will receive Optional.empty().
Next, we’ll have to create a response to answer that request.
2.2. Creating a response
Again the framework is helping us here by doing all the heavy lifting for us. In an MVC context, a response is usually created by using a so called template, which — as we’d like to take a simple step here — can be a static HTML page.
@Controller
class MyController {

  @GetMapping("/hello")
  String myMethod(@RequestParam Optional<String> name) { (1)
    return "hello"; (2)
  }
}
template/hello.html in src/main/resources<html xmlns="http://www.w3.org/1999/xhtml">
<head>
<title>Hello!</title>
</head>
<body>
<h1>Hello!</h1>
</body>
</html>| 1 | The method signature has been changed to return a String now. |
| 2 | The method returns a logical name to select a view. The simple hello will be translated into a lookup of a file under templates/hello.html (usually placed in src/main/resources). |
2.3. Using a model
Let’s say we’d want refer to the name provided as request parameter from within the view template.
The "communication" between controller and view is achieved using a model.
Spring MVC provides a programmatic abstraction for that which can be accessed by just declaring Model as controller method parameter.
@Controller
class MyController {

  @GetMapping("/hello")
  String myMethod(@RequestParam Optional<String> name, Model model) { (1)

    model.addAttribute("name", name.orElse("World")); (2)

    return "hello";
  }
}| 1 | Framework provides access to the model if we declare a corresponding method parameter. |
| 2 | We can then populate the model by adding an attribute named name to it.
As the request parameter can be absent, we default it to World here. |
<html xmlns="http://www.w3.org/1999/xhtml" xmlns:th="http://www.thymeleaf.org"> (1)
  <head>
    <title>Hello!</title>
  </head>
  <body>
    <h1 th:text="${'Hello, ' + name + '!'}">Hello!</h1> (2)
  </body>
</html>| 1 | We register an XML namespace for Thymeleaf, a template engine that allows us to enrich our previously static template with dynamic parts.
All elements and attributes from the th-namespace will be processed by the template engine and replace the content of the elements that carry the attributes. |
2.4. Invoking business logic
Let’s make this practical. Assume we’d want to treat one particular name in a special way. A naïve approach might be to implement that particular logic directly in the controller.
@Controller
class MyController {

  @GetMapping("/hello")
  String myMethod(@RequestParam Optional<String> name, Model model) {

    var whoToGreet = name
      .map(it -> it.equals("TU Dresden") ? it.concat(", yay") : it) (1)
      .orElse("World");

    model.addAttribute("name", whoToGreet);

    return "hello";
  }
}| 1 | We treat TU Dresden given as name by effectively turning it into a TU Dresden, yay |
Here, we evaluate the Optional parameter by calling its ….map(…) method, which takes a Function as argument that translates the value contained in the Optional into a new value if one is present.
If no value was contained in the first place, in other words, if no request parameter called "name" was given.
The function is declared as Java 8 Lambda expression that takes a name for the input parameter, followed by an arrow →, followed by either an expression (as shown above) or a block ({ }).
The actual expression here is a ternary if, that follows the ${condition} ? ${if true} : ${if false} syntax.
We compare the value of the Optional (bound to it) to TU Dresden and append a , yay in case of a match.
If not, we keep the value as is.
The final ….orElse(…) step defaults the value, eventually assigned to whoToGreet to world, as — remember — the Optional might be empty in the first place.
We then add the calculated value under the variable name "name" to the model and return the String "hello" to select the hello.html template to render the view.
What’s the problem with this?
We’re starting to intermingle different concerns here: we’re mixing request handling (mapping the request, accessing the request parameter) and response preparing logic (populating the model) with the actual business logic.
But why is this a problem?
The more concerns we mix together, the harder it will become to actually test certain aspects of the application.
Assume, we only wanted to test that TU Dresden gets translated into TU Dresden, yay.
The test code would have to look something like this:
MyControllerUnitTest.java in package example under src/test/javaimport static org.assertj.core.api.Assertions.*;
class MyControllerUnitTests {
@Test
void augmentsYayToTuDresden() {
var controller = new MyController();
var model = new ExtendedModelMap();
controller.myMethod(Optional.of("TU Dresden"), model);
assertThat(model.asMap().get("name")).isEqualTo("TU Dresden, yay");
}
}We basically have to mimic the frameworks behavior here and can only test the actual business logic in an indirect way.
We have to prepare a Model instance, which requires knowledge about the framework.
We invoke the method just like the framework.
And finally, we have to know about the key that we use to populate the model.
Sure we could use a constant here but let’s try something different and see how this affects both the controller implementation and the test code.
Let’s extract the actual business logic into a separate class:
Greeter.java in package example under src/main/javaclass Greeter {
String greet(String input) {
Assert.hasText(input, "Input must not be null or empty!");
return input.equals("TU Dresden") ? input.concat(", yay") : input;
}
}This piece of code is way more precise as it leaves all web related artifacts away. It’s pure business logic: verify the input actually has text and perform our business logic on it. So, what would a test for the business logic implemented like this look like?
GreeterUnitTests.java in package example under src/test/javaclass GreeterUnitTests {
@Test
void augmentsYayToTuDresden() {
var greeter = new Greeter();
assertThat(greeter.greet("TU Dresden")).isEqualTo("TU Dresden, yay");
}
}Note, how the code has become significantly simpler as we don’t have to deal with the framework APIs at all.
How do we actually integrate the functionality extracted into the Greeter class into the controller.
If we want to call the method on Greeter, we need to make sure the controller gets an instance of it.
That means, the controller has a dependency on Greeter — the former cannot work without the latter.
A dependency of a class is expressed by creating a constructor taking the dependency as argument.
We keep the reference around in a field, so that we can use it in the method.
Greeter in the controller@Controller
class MyController {
private final Greeter greeter; (1)
MyController(Greeter greeter) { (2)
this.greeter = greeter;
}
@GetMapping("/hello")
String myMethod(@RequestParam Optional<String> name, Model model) {
var whoToGreet = name.map(it -> greeter.greet(it)).orElse("World"); (3)
model.addAttribute("name", whoToGreet); (4)
return "hello";
}
}| 1 | A field to keep the dependency around and to be able to refer to it from within the method. |
| 2 | A constructor to express the dependency. |
| 3 | Using the Greeter to access the business logic implemented in it. |
| 4 | Add result to the model. |
Described as a UML diagram our arrangement now looks as shown below.
Our controller class, that takes care of accepting the HTTP requests, delegates the actual execution of the business logic to the simple Java class Greeter.

If we try to run this piece of code, the application will fail to start and express it cannot create an instance of MyController as it doesn’t know about a Greeter.
2016-10-18 12:48:21.468 ERROR 3188 --- [ restartedMain] o.s.b.d.LoggingFailureAnalysisReporter :
***************************
APPLICATION FAILED TO START
***************************
Description:
Parameter 0 of constructor in example.MyController required a bean of type 'example.Greeter' that could not be found.
Action:
Consider defining a bean of type 'example.Greeter' in your configuration.Why is that?
Remember that Spring will create instances of the classes it knows about?
It knows about the controller class, as it is annotated with @Controller.
It discovers the constructor and realizes that it needs an instance of Greeter first.
However, Greeter is not under Spring’s control yet as we have not expressed that it is supposed to be managed by Spring yet.
We can fix this by annotating Greeter with @Component.
Greeter into a Spring bean@Component (1)
class Greeter {

  String greet(String input) {

    Assert.hasText(input, "Input must not be null or empty!");

    return input.equals("TU Dresden") ? input.concat(", yay") : input;
  }
}| 1 | The @Component annotation will make the class known to Spring and available for injection into other Spring beans. |
Logically, our arrangement has changed to the following.
Note, how the Greeter now also carries a stereotype, which causes it to be discovered by Spring.

During the next bootstrap, the following will happen:
-
Spring scans your application and it will find both
MyControllerandGreeteras they’re both annotated. -
Spring will discover that — for a
MyComponentinstance to be created — it needs aGreeterinstance first. -
Spring creates the
Greeterinstance. -
Spring creates the
MyComponentinstance by handing the just createdGreeterinstance to the constructor.
Effectively, what Spring does at runtime is roughly equivalent to this snippet of code:
var greeter = new Greeter();
var controller = new MyController(greeter);
The concept of exposing a required dependency as constructor parameter and some code (framework or manually written) handing in instances of those dependencies is called Inversion of Control. Read more about that in Inversion of Control.
Appendix
Appendix A: Recommended guides
Appendix B: Resources
Appendix C: License
